|
|
||||||||||
 |
|
|
|
|
Contents
WebMux™ Packing List
WebMux™ Main Components Front View 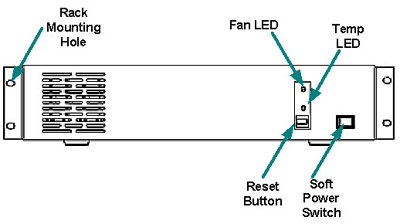
This switch toggles power on and off. To power off, the switch must be pressed and held for 5 seconds.
Press and release the reset button to reset the WebMux. This process may take several minutes to complete.
When the power is on, the green LED means the WebMux is operating within normal operating temperature range. The LED will turn red when the temperature is out of range.
When the power is on, the LED should turn green to indicates normal fan operation. When cooling fan fails, the LED will turn red.Back to Contents Rear View
Connect this port to the Router LAN switch or hub.
Connect this port to the Server LAN switch or hub.
This port is used by an internal modem. It should be connected to a PSTN (Public Switched Telephone Network) compatible analog phone line. Connecting digital phone line to this port will cause permanent damage to the WebMux™ and void the warranty.
Optionally, you can connect a regular PSTN analog phone set to this port.
Connect this port to another WebMux for the installation of a secondary WebMux. Connect the WebMuxes with the supplied cable. Do not connect anything to this port, if only one WebMux™ is being used.
This switch powers the WebMux on and off. When in the "off" position, the front panel power switch is disabled.
For the initial setup, a VGA compatible monitor is required. Once the initial setup is complete, the monitor is not needed.
Like the VGA monitor, a PS/2 compatible keyboard is required only for the initial setup.
Please use the supplied power cord to connect the WebMux to power source.Back to Contents WebMux Overview Key Features The WebMux is a standalone device designed primarily to load balances IP traffic to multiple web servers. The following lists the key features of the WebMux.
The Webmux family consists of three models. They are:
Back to Contents Network Overview 
The main purpose of the WebMux is to balance the traffic among multiple web servers. The diagram above shows an installation with two WebMuxes. In this configuration, one WebMux serving as the primary, and the other serving as the secondary, or backup, provides a fault tolerant solution. In order that the web servers can share the incoming traffic, the WebMux must be connected to the network. There are two interfaces on the WebMux. One interface connects to the Router LAN. This is the network to which the Internet router is connected. The other interface is connected to the Server LAN. This network connects all the web servers. Next, a Virtual Farm or multiple farms must be configured on the WebMux. The farm then consists of the group of servers that service the same domain or website. For example, to configure a farm (or virtual farm) to serve www.redhillnetworks.com:
Back to Contents Sample Configurations Single WebMux
Note: If there is a firewall between the WebMux and the Internet Router, a rule must be defined in the firewall to allow the IP address of the WebMux interface on the Router LAN along with the farm IP address to communicate out to the Internet on all ports. If you are doing Network Address Translation of the farm address to a non-routable address, then both the farm address and WebMux interface address must be translated to communicate outbound on all ports. Back to Contents Primary and Secondary Installation 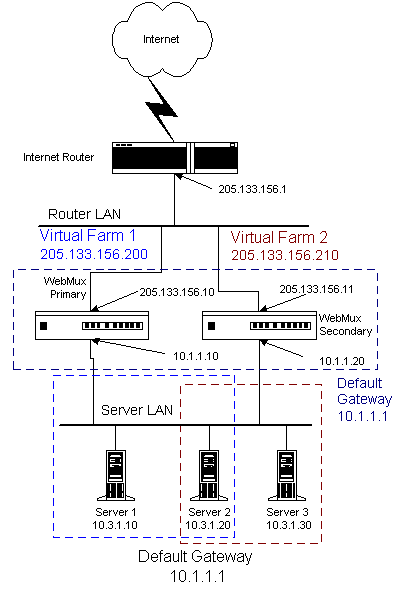
Note: If there is a firewall between the WebMux and the Internet Router, a rule must be defined in the firewall to allow the IP address of the primary and secondary WebMux interfaces on the Router LAN in addition to the farm IP address to communicate out to the Internet on all ports. If you are doing Network Address Translation of the farm address to a non-routable address, then the farm address and both WebMuxes interfaces must be translated to communicate outbound on all ports. Back to Contents Installation Without IP Address Change 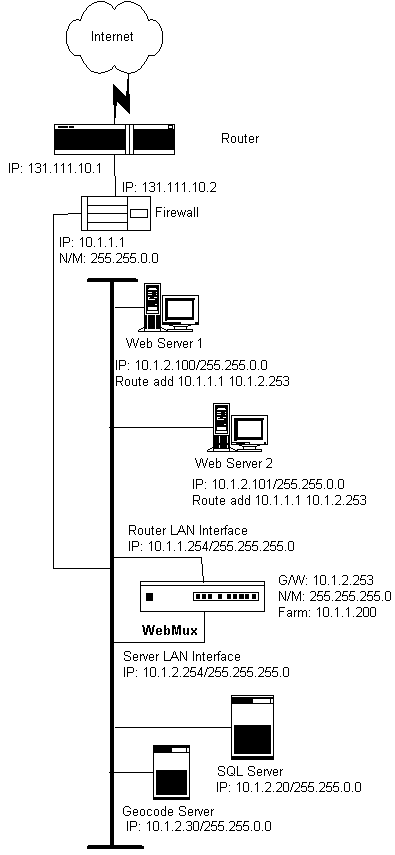
The above diagram is an example about how to install the WebMux without changing the IP addresses of the web servers and other servers that already exist on the network. This is particularly helpful when a complex network of servers already exist in the DMZ. In this configuration, all the servers still remain on the same IP network, and can communicate. From the servers “view”, the WebMux is on the same network. However, since the WebMux uses a different network mask, it “sees” each of its interfaces on a different network. A WebMux can be installed in the above network according to the following procedure. 1. The Network BEFORE the WebMux:
4. In each web server, assign the default gateway of 10.1.2.253. 5. In each web server, add the route statement route add 10.1.1.1 10.1.2.253. Back to Contents Configuring The WebMux Before you start Please collect information about the names and IP addresses pointed by the arrows in the network topology below. 
Network Terminology A Virtual Farm includes the WebMux setup and the servers under it. Functionally, it acts as a single unit on a network. For example, http://www.redhillnetworks.com is one virtual server farm; https://www.redhillnetworks.com is another farm, and Ftp://ftp.redhillnetworks.com is the third farm. The first farm works on a set of servers on port 80, the second farm consists of another set of servers on port 443, and the third farm works on a set of servers on port 21. To serve the Internet, there must be at least one Internet Router.This local area network that connects the router and the WebMux is called the Router LAN. In this LAN, the WebMux takes the Internet traffic and distributes it to the web servers behind it. The LAN connecting WebMux and web servers together is called Server LAN. Only WebMux boxes are connected to both Server LAN. At least one WebMux is needed to define the Router LAN and the normal Server LAN. The side of the WebMux that connects to the Router LAN is to send and receive all the IP packets from the router on the Internet. The side of WebMux that connects to the Server LAN is to send and receive IP packets to and from the servers in the virual farms. By properly configuring WebMux, one can create one or more Virtual Farms on top of physical hardware. Back to Contents Hardware Setup Collect Information
Setup the new network
Configuration Summary CAUTION: Do not proceed without collecting the necessary information.
Initial Configuration WebMux Name: This is the name of the WebMux. It is used for identification purposes. You may call it webmux1, webmux2, etc. Note: This question re-appears when the Initial Configuration is finished and the WebMux completed its reboot. Domain Name: This is for identification only. Although it can be any name, we suggest using the primary domain name of the Router LAN network. If you have only one domain, use that domain name. Router LAN Information Router LAN WebMux IP Address: This is the IP address of the WebMux interface that connects to the Router LAN. Note: This address is not to be the address of a farm or website. In an installation with a primary and secondary, each WebMux must have a unique address. Therefore two unique IP addresses are required for the interfaces on the Router LAN. These IP addresses on the Router LAN can be your Internet registered addresses. Router LAN Network IP Address Mask: This is the network mask of the Server LAN. For a class A network, it may be 255.0.0.0. Router LAN Network IP Address: This is the network address of the Router LAN network. It Is usually the WebMux IP address with the network mask applied. For example, in a class C network, a network address is 192.168.199.0. Router LAN Broadcast IP Address: This address is normally obtained by setting the host bits of the network address to 255 (all bits to 1). An example of a class C broadcast address is 192.168.199.255. Router LAN gateway Address: This address is normally the gateway address of your existing server(s) before adding the WebMux. This would be the IP address of the Internet router’s Ethernet port that connects to the Router LAN. However, if there is a firewall, then this is the IP address of the firewall interface that connects to the same LAN as the Router LAN interface of the WebMux. Server LAN Information Server LAN WebMux IP Address: This is the IP address of the WebMux interface that connects to the Server LAN. These IP address must also be unique. Note: This IP address is for the webmux to check other WebMuxes and servers. I must be different from the Server LAN Gateway IP Address. In an installation with a primary and secondary WebMux, each must have a unique address. Therefore two IP addresses are required for each WebMux interface that connects to the Server LAN. These IP addresses cannot be your Internet registered addresses. They must be Internet non-routable. For example, you can assign addresses in a 10.0.0.0 network, or a 192.168.199.0, etc. LAN Network IP Address Mask This is the IP address mask of the Server LAN. It is usually 255.255.255.0 for class C networks. Server LAN Network IP Address: This is the Server LAN's network address. It is usually the WebMux IP address with the network mask above applied (Host bits are all 0.). If the IP address of the WebMux interface on the Server is 10.1.1.10 (class A), then the Server LAN network address is 10.0.0.0. Server LAN Broadcast IP Address: This address is normally obtained by setting the host bits of the network mask to 255 (all bits to 1). It is then applied to the WebMux IP address above. For example, a broadcast address may be 10.255.255.255. Administration Setup InformationRemake /home/webmux/conf/passwd? This function is provided in case you have forgotten the passwords to access the Management Browser. Use Management Browser for normal password changes. Answer Y to reset the Passwords to factory default. Answer N to leave them unchanged. Enter Admin http Port Number: This is http port number for the Management Browser in Non-Secure mode. For example, one could use 7080 for this. Enter Admin https Port Number: This is the https port number for Management Browser in Secure mode. For example, 7443 could be used for this. Is this WebMux Primary or Secondary? For a single WebMux, Answer Primary. In an installation with two WebMuxes, one is called Primary and the other Secondary. During normal operation, the Primary WebMux is directing the IP traffic. The Secondary WebMux will take over the duties when the Primary is down. Assign the Primary and Secondary WebMux and answer this question during setup accordingly. For Secondary OnlyDuring the initial configuration of the secondary WebMux, you will be asked to provide the Router LAN WebMux IP Address and Server LAN WebMux IP Address of the Primary WebMux. WebMux Information Enter Server LAN Gateway IP Address: This is for the Primary WebMux ONLY or for the single WebMux setup. This IP address will be the Default Gateway entry for all the web servers on the Server LAN. For example, in the installation with a primary and secondary, if a gateway IP address of 10.1.1.1 is used, the address will 'float' between the primary and secondary WebMux. When the primary is down, the Secondary becomes 10.1.1.1. In the single WebMux setup, this address also CANNOT be the same as the WebMux IP interface on the Server LAN.Enter Server LAN Network mask: It is normally 255.255.255.0 for a class C address, and 255.0.0.0 for a class A address. (Re)initialize your config file with Admin farm? This selection is typically for a primary and secondary installation, or if you are running passive FTP. Answer Y to add a secured and unsecured Administrative farm to the WebMux configuration.By creating an Admin farm, the WebMux will not let FTP use the admin port. Also, this allows status page to be reached if one of the WebMuxes is not available. Reboot now? This is the end of initial configuration. Most of the setup or changes require reboot to take effect. Answer Y to reboot. After the reboot is complete, the first question, "Enter WebMux host name", will re-appear. At this time, the initial Configuration is complete, and you can access the WebMux from the Management Browser. If the configuration is incorrect, type N. You can go through the configuration again. Back to ContentsManagement Browser After the Initial Configuration, the web browser does all of the WebMux management. The following explains each of the easy to use management browser screens.
Start Login Page:
Note: In order for the browser to manage the WebMux, the browser must be set to accept all cookies. 
User ID: There are two default user IDs
Login: After entering the correct password, click Login. Note: For first time setup, please login as Super user and go to the Administration Setup by clicking the Setup button. It is important to set up the Server Farm Gateway IP address and network mask first. Back to Contents Administration Setup Page When the correct password is entered, click Login. Please note: For first time setup, please login as Superuser and go to the Administration Setup by clicking the Setup button. It is important to set up the Server Farm Gateway IP address and mask first. 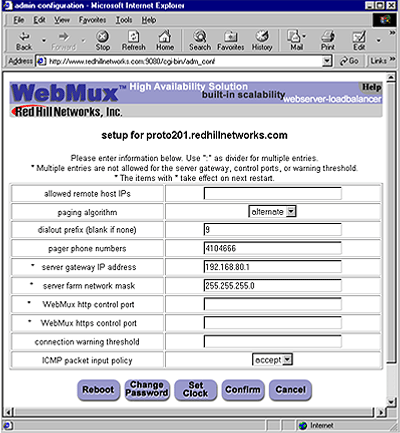
Allowed remote host IPs: The WebMux management software only allows logins from these IP addresses to establish a management session. You can access from more than one IP address by specifying all the allowed IP addresses separated by a ":". If this field is left blank, you can access the management software from any IP address. When IP addresses are entered, you can only access it from the IP addresses in the field. This field is blank by default. Paging Algorithm:
Dialout prefix: Some phone systems require a prefix for outside phone numbers. If a prefix is required, enter it here. Leave it blank if a prefix is not required. Pager phone numbers: This is the pager phone number to be dialed when an abnormal condition occurs. Enter the number without any of the special characters or spaces. It should be in the format of a single long integer. Add 1 and the area code if needed. Do not use "()" or "-" or blank spaces. Server gateway IP address: The WebMux appears to all the servers under it as a gateway or router. This is the IP address for the WebMux to assume the router role for the servers. Please note - For first time setup, it is very important to set up this address and the Server Farm network mask (below) first. Also when setting up the servers, you may be asked to fill in the default gateway IP address for the server. Use this IP address to setup all the servers under it. The WebMux will not function properly if this IP address is not set correctly for both WebMux and the servers. Server farm network mask: The network mask for the WebMux and all the servers in the Server LAN. WebMux http control port: Since WebMux does the address translation for the incoming traffic, the http and https port for the management console must be set to a pair of different ports. By default, the pair of ports is 7080 and 7443. You can change that to another pair of ports, if so desired. Do not enter more than two ports. Connection warning threshold: The WebMux monitors the number of connections established. When the number of connections is greater than the value entered, the WebMux will page the designated numbers. For example, if a DoS attack is occurring, the number of connections to the site would be extremely high. Assuming they exceeded the value set for the “connection warning” threshold, the designated numbers would be paged. ICMP Packet input policy
Reboot: Changes to "server gateway address", "server farm network mask" and "WebMux http control port", and WebMux https control port” require a reboot of the WebMux to take effect. You can use the Reboot button to reboot the WebMux remotely. Change Password: 
Name: Select the login name for which the password is to be changed. New Password: Enter the new password. This is the password to which the login will be changed. New Password Again: Enter the same password as in the previous box. Confirm/Cancel: Click CONFIRM to execute the change. Click CANCEL to return to the previous screen WITHOUT changing the password. Set Clock: 
Month: Enter the number of the month, 1 through 12. Leading zeroes are not necessary. Day of the Month: Enter the day of the month, 1 through 31. Year: Enter the year. Enter all 4 digits. Hour: Enter the hour of the day. Use the 24 hour clock, or military time. Minute: Enter the minute of the hour. Please note - The recommendation is to set the WebMux clock to UTC (GMT) time. Time Zone: Select the time or hour offset to the UTC time. Confirm/Cancel: Click CONFIRM to execute the date and time change. Click CANCEL to return to the previous screen WITHOUT making any date or time changes. Click this button to go to the “Set the Clock” page. The time and date of the WebMux then can be set. Back to Contents Status Page 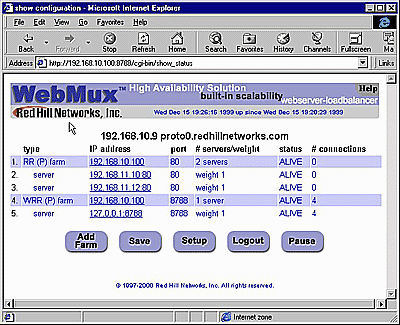
Add Farm: Click Add Farmto add a virtual web or FTP site. Save: Changes made to the "Farm" and "Server" will take effect immediately. The changes however are not saved permanently to the flash memory until the "Save" button is clicked. Unsaved settings may be lost during power outage or WebMux reboot. Setup: This button leads to the setup page. "Super User" login is required to access this page. Logout: It is not recommended to leave the management browser login unattended. Use the Logout button to close the session. Pause: The status screen auto refreshes frequently to provide most up to date status. You can use the Pause button to freeze the auto refresh. Resume: After the Pause button been pushed, it will change to Resume and the auto refresh stopped. Click the Resume button to restart the auto refresh. Back to Contents Add Farm 
Farm IP address: This is the IP address of the new farm. Caution: Once the new farm is added, the IP address cannot be changed. To correct the IP address, the old one has to be deleted and a new one created. The farm address is the Internet known address. For example, if you want to create an http farm for www.yourdomain.com, the farm IP address will be the IP address for www.yourdomain.com from your DNS record. If the IP address of www.yourdomain.com is 205.188.166.10, then the Farm IP address is also 205.188.166.10. The WebMux will then translate the farm address to the web server address in your DMZ or internal network. If you use WebMux for your intranet, then the farm IP address will be the IP address of the original web or application server. The IP addresses of the original web or application servers must be changed so that the WebMux can translate farm IP address to the server IP address. Service: This the service port of the new farm. Select a service to create a farm using its well-known port. If a port other than a well-known port for TCP or UDP service is to be used, then choose one of the “Generic” selections. Then enter the port number in the PORT NUMBER box. No port number needed to be specified, if the service protocol is on the list. Caution: Once the new farm is created, the port number cannot be changed. Like the IP address, the old farm needs to be deleted and a new one created.
Scheduling method: The scheduling method is the way in which traffic is distributed among the servers in the farm. Eight different methods are supported. If you are using a shopping cart service, a persistent scheduling method is recommended.
Back to Contents Add Server 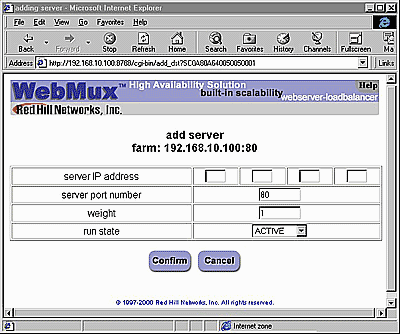
Server IP Address: This is the IP address of the server to be added. CAUTION: Once the server is added, the IP address cannot be changed. To correct the IP address, the old server needs to be deleted and a new one created. Server Port Number: Port number of the server to be added. CAUTION: Like the IP address, once created, the port number cannot be changed. To correct the port number, the old server needs to be deleted and a new one created. Weight: Scheduling priority weight. Valid integer numbers are between 1 and 100. A special zero weight setting is provided for a graceful shut down of a server. When the weight is changed to zero, the WebMux will not make new connections, but will maintain all current connections to the server. The connections will gradually reduce to zero as current clients’ sessions terminate. When there are no connections, the server is functionally “dead” or off line until the weight is changed back to a valid number. Then the server can then be shutdown or taken out of service without affecting any users. CAUTION: Unlike a server that can go down unexpectedly, the WebMux will not move a STANDBY server to ACTIVE when one or more server's weight is set to zero. If the weight of all the servers in a farm were set to zero, then the farm would be “down” because none of the servers are accepting new connections. Run State:
Modify Farm 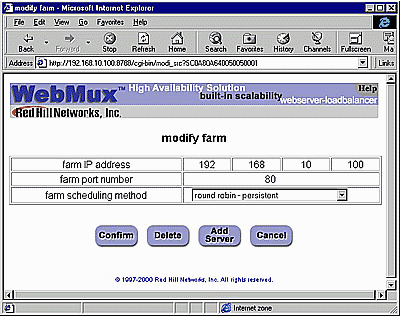
Farm IP address and port number: These numbers are displayed here for reference purposes. These fields are set in the "Add Farm" screen. Once set, they are not changeable. If they must be changed, delete the farm and then add a new one. Farm scheduling method: Eight different methods are supported:
Delete: Click this button to delete the entire farm. CAUTION: This function also deletes ALL the servers under this farm. Add Server: Click this button to add a new server to this farm. Back to Contents Modify Server 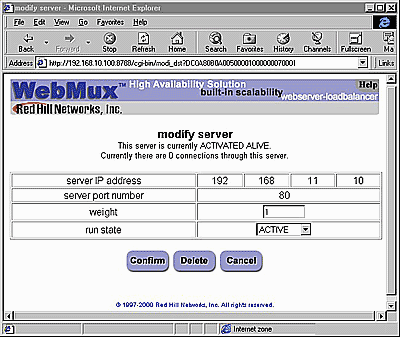
Destination server IP address and port number: These parameters are set in the ADD SERVER screen. Once set, these fields cannot be modified. To correct this setting, delete the server and add a new one. Weight: Scheduling priority weight. Valid integer numbers are between 1 to 100. Running state:
Phone Paging Codes When error occurs, the WebMux will send an error code to the regular numerical pager assigned in the Administration Setup page. Please refer to the Management Browser - Administration Setup section on setting up phone pager numbers. To be as compatible as possible to different types of pagers, only numeric error codes are used. The minimum requirement is the pager should be able to display up to 18 digits. If the pager cannot display 18 digits, some codes may get truncated. For WebMux (Single and with Secondary)
For WebMux Primary Only
FAQs
Back to Contents Contact Information For the latest product and support information, please visit our web site at: http://www.redhillnetworks.com. To reach us by e-mail: Support: support@redhillnetworks.com Sales: sales@redhillnetworks.com Our address and phone number are: Red Hill Networks, Inc. 1411 Warner Avenue, Suite A Tustin, CA 92780 Phone: (714)259-1050 FAX: (714)259-1052 Back to Contents |